Tomorrow I'll be turning 23. I can hardly believe it. This past year has just flown by. We probably won't do anything to exciting. Probably won't even have a birthday party even though I really wanted to have my dad over. My little sister wouldn't be able to make it. She's going to her BF's sisters birthday party in Spokane that same day. My other sister is in Bible College in California and my mom is in New York. Sooooooo, I might not get to see my family on my birthday which would completely suck. My BF hasn't realized exactly how much they mean to me. I hope he does someday though.
Oh gosh. This is just terrible. It's the day before my birthday and I'm crying. Probably has something to do with the fact that once again this year my mom won't be here for my special day and also, the fact that she got married the day before yesterday, is just a little sad for me. Oh, and the fact that my horse (best friend EVER) died last year after 8 years of the most wonderful times a girl could ever ask for. I wish I could turn the clock back a year and do things differently. Maybe then, all this pain I feel when I think about those things either wouldn't exist or would be a little less.
Any who, so sorry about this sad blog post. Hopefully tomorrows will be happier. :-D Happy Birthday to any other March 1st Babies out there.
Julee
Monday, February 28, 2011

Friday, February 25, 2011
Quick Crochet Triangle Hot Pad Tutorial/ Pattern
This pattern has not been tested yet. If you find an error please leave a comment and I will correct it. This is the first time I've posted a tutorial so it might be a bit rough. I hope it works though. :-D
Triangle Hot Pad Tutorial
By Julee A. Reeves
 Finished Size: 8 1/2" Across each Side.
Materials:
Less Than 2 ozs worsted weight cotton yarn
“H” crochet hook
Tapestry Needle
Just a little bit of time.
Stitches Used: Ch, Sl St, Sc, Dc.
Special Stitches:
Shell: (2 Dc, Ch2, 2 Dc) in indicated space.
Gauge:
First 2 Rnds of pattern= 2 ¾”
Rnd 1: Ch4, [Dc, Ch2, (2 Dc, Ch2) 5 times] all in 4th Ch from hook. Sl St in top of Beg Ch3 and in next Dc and Ch2 Sp. (12 Dc, 6 Ch2 Sps)
Rnd 2: Ch3, (Dc, Ch2, 2 Dc) in same Ch2 Sp as Sl St, Ch1, (Shell, Ch1) 5 times. Sl St in top of Beg Ch3 and in next Dc and Ch2 Sp.
(6 Shells, 6 Ch1 Sps)
Rnd 3: Ch3, (Dc, Ch2, 2 Dc) in same Ch2 Sp as Sl St, Ch1, 2 Dc, Ch1 in next Ch1 Sp, Ch1, (Shell in next Ch2 Sp, Ch1, 2 Dc in next Ch1 Sp, Ch1) 5 times. Sl St in top of Beg Ch3 and in next Dc and Ch2 Sp.
(6 Shells, 12 Dc, 12 Ch1 Sps)
Rnd 4: Ch3, (Dc, Ch2, 2 Dc) in same Ch2 Sp as Sl St, Ch1, (2 Dc, Ch1 in next Ch1 Sp) 2 times, [Shell in next Ch2 Sp, Ch1, (2 Dc, Ch1 in next Ch1 Sp) 2 times] Repeat [ to ] 5 times. Sl St in top of Beg Ch3 and in next Dc and Ch2 Sp. (6 Shells, 24 Dc, 18 Ch1 Sps)
Rnd 5: Ch3, (Dc, Ch2, 2 Dc) in same Ch2 Sp as Sl St, Ch1, (2 Dc, Ch1 in next Ch1 Sp) 3 times, [Shell in next Ch2 Sp, Ch1, (2 Dc, Ch1 in next Ch1 Sp) 3 times] Repeat [ to ] 5 times. Sl St in top of Beg Ch3 and in next Dc and Ch2 Sp. (6 Shells, 36 Dc, 24 Ch1 Sps)
Rnd 6: Ch3, (Dc, Ch2, 2 Dc) in same Ch2 Sp as Sl St, Ch1, (2 Dc, Ch1 in next Ch1 Sp) 4 times, [Shell in next Ch2 Sp, Ch1, (2 Dc, Ch1 in next Ch1 Sp) 4 times] Repeat [ to ] 5 times. Sl St in top of Beg Ch3 and in next Dc and Ch2 Sp. (6 Shells, 48 Dc, 30 Ch1 Sps)
Rnd 7: Ch3, (Dc, Ch2, 2 Dc) in same Ch2 Sp as Sl St, Ch1, (2 Dc, Ch1 in next Ch1 Sp) 5 times, [Shell in next Ch2 Sp, Ch1, (2 Dc, Ch1 in next Ch1 Sp) 5 times] Repeat [ to ] 5 times. Sl St in top of Beg Ch3 and in next Dc and Ch2 Sp. (6 Shells, 60 Dc, 36 Ch1 Sps)
Finish Off leaving 20 inches. Weave yarn to next Dc. You will be using this strand to sew the triangle together. Weave in ends as you go.
Starting with the first Dc on each side of the Ch2 of the shell, Sew each Dc and Ch1 Together across to corner. You can sew through both loops or through the backloops only. You will need an additional 30 Inch piece to sew the last part of the triangle together and for making the hanging loop. When done sewing all sides together make a Chain loop of 11 with a smaller size hook ("F" is usually good). Weave in the final end and you're hot pad is ready to use.


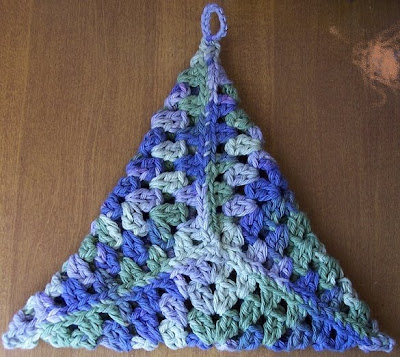
Triangle Hot Pad Tutorial
By Julee A. Reeves
 Finished Size: 8 1/2" Across each Side.
Materials:
Less Than 2 ozs worsted weight cotton yarn
“H” crochet hook
Tapestry Needle
Just a little bit of time.
Stitches Used: Ch, Sl St, Sc, Dc.
Special Stitches:
Shell: (2 Dc, Ch2, 2 Dc) in indicated space.
Gauge:
First 2 Rnds of pattern= 2 ¾”
Rnd 1: Ch4, [Dc, Ch2, (2 Dc, Ch2) 5 times] all in 4th Ch from hook. Sl St in top of Beg Ch3 and in next Dc and Ch2 Sp. (12 Dc, 6 Ch2 Sps)
Rnd 2: Ch3, (Dc, Ch2, 2 Dc) in same Ch2 Sp as Sl St, Ch1, (Shell, Ch1) 5 times. Sl St in top of Beg Ch3 and in next Dc and Ch2 Sp.
(6 Shells, 6 Ch1 Sps)
Rnd 3: Ch3, (Dc, Ch2, 2 Dc) in same Ch2 Sp as Sl St, Ch1, 2 Dc, Ch1 in next Ch1 Sp, Ch1, (Shell in next Ch2 Sp, Ch1, 2 Dc in next Ch1 Sp, Ch1) 5 times. Sl St in top of Beg Ch3 and in next Dc and Ch2 Sp.
(6 Shells, 12 Dc, 12 Ch1 Sps)
Rnd 4: Ch3, (Dc, Ch2, 2 Dc) in same Ch2 Sp as Sl St, Ch1, (2 Dc, Ch1 in next Ch1 Sp) 2 times, [Shell in next Ch2 Sp, Ch1, (2 Dc, Ch1 in next Ch1 Sp) 2 times] Repeat [ to ] 5 times. Sl St in top of Beg Ch3 and in next Dc and Ch2 Sp. (6 Shells, 24 Dc, 18 Ch1 Sps)
Rnd 5: Ch3, (Dc, Ch2, 2 Dc) in same Ch2 Sp as Sl St, Ch1, (2 Dc, Ch1 in next Ch1 Sp) 3 times, [Shell in next Ch2 Sp, Ch1, (2 Dc, Ch1 in next Ch1 Sp) 3 times] Repeat [ to ] 5 times. Sl St in top of Beg Ch3 and in next Dc and Ch2 Sp. (6 Shells, 36 Dc, 24 Ch1 Sps)
Rnd 6: Ch3, (Dc, Ch2, 2 Dc) in same Ch2 Sp as Sl St, Ch1, (2 Dc, Ch1 in next Ch1 Sp) 4 times, [Shell in next Ch2 Sp, Ch1, (2 Dc, Ch1 in next Ch1 Sp) 4 times] Repeat [ to ] 5 times. Sl St in top of Beg Ch3 and in next Dc and Ch2 Sp. (6 Shells, 48 Dc, 30 Ch1 Sps)
Rnd 7: Ch3, (Dc, Ch2, 2 Dc) in same Ch2 Sp as Sl St, Ch1, (2 Dc, Ch1 in next Ch1 Sp) 5 times, [Shell in next Ch2 Sp, Ch1, (2 Dc, Ch1 in next Ch1 Sp) 5 times] Repeat [ to ] 5 times. Sl St in top of Beg Ch3 and in next Dc and Ch2 Sp. (6 Shells, 60 Dc, 36 Ch1 Sps)
Finish Off leaving 20 inches. Weave yarn to next Dc. You will be using this strand to sew the triangle together. Weave in ends as you go.
Starting with the first Dc on each side of the Ch2 of the shell, Sew each Dc and Ch1 Together across to corner. You can sew through both loops or through the backloops only. You will need an additional 30 Inch piece to sew the last part of the triangle together and for making the hanging loop. When done sewing all sides together make a Chain loop of 11 with a smaller size hook ("F" is usually good). Weave in the final end and you're hot pad is ready to use.


Saturday, February 19, 2011
Simply Sophisticated Shells Dish Cloth
*FREE PATTERN*
Simply Sophisticated Shells Dish Cloth

Skill Level: Easy
Materials:
· Sugar’n Cream Stripes Cotton Medium (worsted) weight yarn
(2 oz/56.7 g/ 95 yds
· H/8/5mm crochet hook or size needed to obtain gauge
· Tapestry Needle
Pattern Notes:
Chain 3 at beginning of each round counts as first double crochet.
Special Stitches:
Popcorn: Dc in indicated space 5 times, take hook out of loop and insert into first Dc made, then back into the dropped loop. Pull the loop through the first Dc.
Shell: (2 Dc, Ch2, 2 Dc) in indicated space.V-St: (Dc, Ch1, Dc) in indicated space.
Gauge: First 3 rounds of pattern = 2 ½” Across
Instructions:
Rnd 1: Ch2, 5 Sc in second Ch from Hk; Join with Sl St in first Sc. (5 Sc)
Rnd 2: Ch3, Dc 4 times in same St as Sl St (base of Ch3), take hook out of loop and insert into first Dc made (top of Ch3), then back into the dropped loop. Pull the loop through the first Dc, Ch2 , *Popcorn in next Sc, Ch2*; Repeat from * to * 4 times. Join with Sl St in top of beg Ch3. Sl St in next Ch2 Sp. (5 Popcorn Sts, 5 Ch2 Sps)
Rnd 3: Ch3, (1 Dc, Ch2, 2 Dc) in same Sp as Sl St, Ch1, [Shell in next Ch2 Sp, Ch1] 4 times. Join with Sl St in top of beg Ch3. Sl St in next Dc and Ch2 Sp. (5 Shells)
Rnd 4: Ch3, (1 Dc, Ch2, 2 Dc) in same Sp as Sl St, V-St in next Ch1 Sp, [Shell in next Ch2 Sp, V-St in next Ch1 Sp] 4 times. Join with Sl St in top of beg Ch3. Sl St in next Dc and Ch2 Sp.
(5 Shells, 5 V-Sts)
Rnd 5: Ch3, (1 Dc, Ch2, 2 Dc) in same Sp as Sl St, (Ch1, Shell) in each Ch1 and Ch2 Sp around, Ch1. Join with Sl St in top of beg Ch3. Sl St in next Dc and Ch2 Sp.(10 Shells)
Rnd 6: Ch3, (1 Dc, Ch2, 2 Dc) in same Sp as Sl St, V-St in next Ch1 Sp, [Shell in next Ch2 Sp, V-St in next Ch1 Sp] 9 times. Join with Sl St in top of beg Ch3. Sl St in next Dc and Ch2 Sp. (10 Shells, 10 V-Sts)
Rnd 7: Repeat rnd 5. (20 Shells)
Rnd 8: Ch3, (1 Dc, Ch2, 2 Dc) in same Sp as Sl St, V-St in next Ch1 Sp, [Shell in next Ch2 Sp, V-St in next Ch1 Sp] 9 times. Join with Sl St in top of beg Ch3. Sl St in next Dc.
(20 Shells, 20 V-Sts)
Note: Shell in the V-Sts, and Sl St in Ch2 Sp of the each Shell.
Rnd 9: [Sl St in next Ch2 Sp, Shell in next Ch1 Sp] 20 times. Join with Sl St in first Sl St of round. (20 Shells, 20 Sl Sts not including joining Sl St)
Fasten off leaving at least 6” and weave in ends securely with tapestry needle.
Simply Sophisticated Shells Dish Cloth

Skill Level: Easy
Materials:
· Sugar’n Cream Stripes Cotton Medium (worsted) weight yarn
(2 oz/56.7 g/ 95 yds
· H/8/5mm crochet hook or size needed to obtain gauge
· Tapestry Needle
Pattern Notes:
Chain 3 at beginning of each round counts as first double crochet.
Special Stitches:
Popcorn: Dc in indicated space 5 times, take hook out of loop and insert into first Dc made, then back into the dropped loop. Pull the loop through the first Dc.
Shell: (2 Dc, Ch2, 2 Dc) in indicated space.V-St: (Dc, Ch1, Dc) in indicated space.
Gauge: First 3 rounds of pattern = 2 ½” Across
Instructions:
Rnd 1: Ch2, 5 Sc in second Ch from Hk; Join with Sl St in first Sc. (5 Sc)
Rnd 2: Ch3, Dc 4 times in same St as Sl St (base of Ch3), take hook out of loop and insert into first Dc made (top of Ch3), then back into the dropped loop. Pull the loop through the first Dc, Ch2 , *Popcorn in next Sc, Ch2*; Repeat from * to * 4 times. Join with Sl St in top of beg Ch3. Sl St in next Ch2 Sp. (5 Popcorn Sts, 5 Ch2 Sps)
Rnd 3: Ch3, (1 Dc, Ch2, 2 Dc) in same Sp as Sl St, Ch1, [Shell in next Ch2 Sp, Ch1] 4 times. Join with Sl St in top of beg Ch3. Sl St in next Dc and Ch2 Sp. (5 Shells)
Rnd 4: Ch3, (1 Dc, Ch2, 2 Dc) in same Sp as Sl St, V-St in next Ch1 Sp, [Shell in next Ch2 Sp, V-St in next Ch1 Sp] 4 times. Join with Sl St in top of beg Ch3. Sl St in next Dc and Ch2 Sp.
(5 Shells, 5 V-Sts)
Rnd 5: Ch3, (1 Dc, Ch2, 2 Dc) in same Sp as Sl St, (Ch1, Shell) in each Ch1 and Ch2 Sp around, Ch1. Join with Sl St in top of beg Ch3. Sl St in next Dc and Ch2 Sp.(10 Shells)
Rnd 6: Ch3, (1 Dc, Ch2, 2 Dc) in same Sp as Sl St, V-St in next Ch1 Sp, [Shell in next Ch2 Sp, V-St in next Ch1 Sp] 9 times. Join with Sl St in top of beg Ch3. Sl St in next Dc and Ch2 Sp. (10 Shells, 10 V-Sts)
Rnd 7: Repeat rnd 5. (20 Shells)
Rnd 8: Ch3, (1 Dc, Ch2, 2 Dc) in same Sp as Sl St, V-St in next Ch1 Sp, [Shell in next Ch2 Sp, V-St in next Ch1 Sp] 9 times. Join with Sl St in top of beg Ch3. Sl St in next Dc.
(20 Shells, 20 V-Sts)
Note: Shell in the V-Sts, and Sl St in Ch2 Sp of the each Shell.
Rnd 9: [Sl St in next Ch2 Sp, Shell in next Ch1 Sp] 20 times. Join with Sl St in first Sl St of round. (20 Shells, 20 Sl Sts not including joining Sl St)
Fasten off leaving at least 6” and weave in ends securely with tapestry needle.
Wednesday, February 2, 2011
So FRUSTRATED- Bad Customer Story
Ok. Yesterday (early afternoon) a lady named Mary Jo (not TampaDoll just in case anyone is wondering) ordered a pattern off my etsy site. She immediately sent me an email and a message via etsy demanding to know where to "down load" the pattern she had purchased. I tried to email her the pattern (which is what I do as soon as I receive a pattern order) at which time I got this message from MAILER-DAEMON@mx3.midco.net :
Hi. This is the qmail-send program at mx3.midco.net.
I'm afraid I wasn't able to deliver your message to the following addresses.
This is a permanent error; I've given up. Sorry it didn't work out.
:
The users mailfolder is over the allowed quota (size). (#5.2.2)
After receiving that message I sent her another message on etsy telling her that her email was not working and I asked for a working email address so I could get her the pattern. 24 hours later and some negative etsy feed back I did not deserve as well as issuing her a refund and canceling her order, I FINALLY hear from her after my many attempts of contacting her over a long period of time. She again claimed I had horrible customer service (which she also stated in her email and etsy message to me) and claimed that I had not told her how to get the pattern (at the end of the listing for the pattern she purchased it clearly said that I'd be emailing the pattern out).
In that long awaited message she sent to me she said "I certainly will put the word out on Ravely about the service I got from you." Ok. How many times does a person have to try and get a pattern to someone before they just give up. I tried at least 10 times.
My stomach has been in knots all day long. I've worked such a long time to get a good reputation built up and this person is bent on destroying that. I'm just about in tears over it. Makes me just want to quit selling my patterns. If that is what I have to deal with I just don't think it's worth it.
Anyways, If any of you all see any one bad mouthing me any where on the internet please let me know. I'm a hard working individual and I do not deserve to be slandered.
Thanks everyone!! I think I'm gonna go try and crochet again and get rid of this stress.
Hi. This is the qmail-send program at mx3.midco.net.
I'm afraid I wasn't able to deliver your message to the following addresses.
This is a permanent error; I've given up. Sorry it didn't work out.
The users mailfolder is over the allowed quota (size). (#5.2.2)
After receiving that message I sent her another message on etsy telling her that her email was not working and I asked for a working email address so I could get her the pattern. 24 hours later and some negative etsy feed back I did not deserve as well as issuing her a refund and canceling her order, I FINALLY hear from her after my many attempts of contacting her over a long period of time. She again claimed I had horrible customer service (which she also stated in her email and etsy message to me) and claimed that I had not told her how to get the pattern (at the end of the listing for the pattern she purchased it clearly said that I'd be emailing the pattern out).
In that long awaited message she sent to me she said "I certainly will put the word out on Ravely about the service I got from you." Ok. How many times does a person have to try and get a pattern to someone before they just give up. I tried at least 10 times.
My stomach has been in knots all day long. I've worked such a long time to get a good reputation built up and this person is bent on destroying that. I'm just about in tears over it. Makes me just want to quit selling my patterns. If that is what I have to deal with I just don't think it's worth it.
Anyways, If any of you all see any one bad mouthing me any where on the internet please let me know. I'm a hard working individual and I do not deserve to be slandered.
Thanks everyone!! I think I'm gonna go try and crochet again and get rid of this stress.
Monday, January 31, 2011
*NEW* Fun and Totally FAB Ski Hat

This pattern is available for purchase in either my Etsy Shop, Ravelry or right here on my blog (just click on BUY NOW). Pattern will be emailed to you within 24 hours of receiving payment.
I had SOOOOO much fun designing this hat and I've made quite a few of them in the past week. I can't help myself. I have to keep trying different color combination's and yarns. So far my favorite ones are the ones I have included in this post.
This pattern has 7 cables running down it with 2 cables running right down through the ear flap. By using a darker main color (MC), a lighter contrasting color (CC)and my pattern you can create some beautiful and eye catching hats for anyone you know or yourself.
Materials:
Approx. 3 ounces Worsted Weight yarn of choice main color (MC)
Approx.2 ounces Worsted Weight yarn of contrasting color (CC)
“H” crochet hook (for smaller size use “G” hook)
Tapestry Needle for weaving in ends
7 Stitch Markers or small scrap pieces of yarn
If you have any questions regarding this design or would like one of these snazzy hats created just for you please leave a comment and I'll get back to you ASAP.
Sunday, January 16, 2011
Finishing Your Crocheted Item!!!!
I just thought it'd be fun to write about something that is very important in the Art of Crochet- Weaving in ends. It's something that can make or break a project (most literally). If you weave in your ends properly your item can last a very LONGGGGGG time if you don't your item could fall apart very quickly. Could be it falls apart the first time you or someone else wears it or it could fall apart the first time it's washed. You just never know.
A few things I remember when I weave in ends on a project is to:
1. Always use a tapestry needle (or a needle that matches the thread or yarn you are working with). It makes maneuvering the yarn through stitches so much easier and makes it look so much smoother.
2. Don't crochet over the end. Most people are taught to weave in ends that way and it's an almost certain to destroy your project. It's soooo easy for the ends to be tugged at and pulled out of your project.
3. Use multiple rows or rounds if they are available. Doing so will ensure that yarn stays secure and will be more difficult to be pulled at.
4. ALWAYS leave at least 6 inches of yarn. When I first started crocheting I left sometimes only an inch or so of yarn after I was done with a project and I was always so disappointed when my project came unraveled so easily. It was a lesson that was learned the hard way but I'm so glad I did learn. It's saved me a lot of grief.
Remember that when you finish a project off you want who ever receives it to be able to enjoy it for a long time. Whether it's just for friends or family or for clients who purchase your crocheted goods. That is a another reason why it's so important to make sure your item is finished correctly. You don't want an unhappy customer. You want them to come back time, after time and tell others about your quality work.
I know most of the things I've mentioned are things most crocheters already know and practice but if you don't hold this practice very highly I challenge you to challenge the way you weave in your ends. I promise you it will pay you back over and over in the long run.
A few things I remember when I weave in ends on a project is to:
1. Always use a tapestry needle (or a needle that matches the thread or yarn you are working with). It makes maneuvering the yarn through stitches so much easier and makes it look so much smoother.
2. Don't crochet over the end. Most people are taught to weave in ends that way and it's an almost certain to destroy your project. It's soooo easy for the ends to be tugged at and pulled out of your project.
3. Use multiple rows or rounds if they are available. Doing so will ensure that yarn stays secure and will be more difficult to be pulled at.
4. ALWAYS leave at least 6 inches of yarn. When I first started crocheting I left sometimes only an inch or so of yarn after I was done with a project and I was always so disappointed when my project came unraveled so easily. It was a lesson that was learned the hard way but I'm so glad I did learn. It's saved me a lot of grief.
Remember that when you finish a project off you want who ever receives it to be able to enjoy it for a long time. Whether it's just for friends or family or for clients who purchase your crocheted goods. That is a another reason why it's so important to make sure your item is finished correctly. You don't want an unhappy customer. You want them to come back time, after time and tell others about your quality work.
I know most of the things I've mentioned are things most crocheters already know and practice but if you don't hold this practice very highly I challenge you to challenge the way you weave in your ends. I promise you it will pay you back over and over in the long run.
X's and O's Cross Stitch Brimmed Hat

Ok. There's my newest design thingy. I don't have a pattern for it yet but I think I'm gonna wait a bit to write one up. I have it listed on Etsy. I'm really hoping it sells soon. Hours have been cut at work and I could really use the extra cash.
Right now I'm working on a new design that involves pineapples and headware. It's gonna be sooooo cute. I'll share a pic as soon as it's done. :-D
As far as work and life goes. It's just rolling right along. The days are flying by sooooo fast I can hardly believe it. It seems like as soon as I wake up it's time to go back to bed again. Yikes.
Oooooo, I'm getting a new (used) car soon. I'm so excited. Now if I could just remember the year and brand of the car. :-) I have one last payment to make on it and it's mine. It's really stretched me tight but it will be worth it. My old buick ('86, Century) died on me about a month or two ago so I've been using my BF's car and walking to work. I live close so it's not a huge deal. It's just really cold outside so it can be uncomfortable. Oh well. I've lived around the cold and snow my whole life so I'm pretty used to it.
Well, I've got about 5 hours till I head to work so I'm gonna work on my newest design and browse the internet a little till Andrew gets home.
Have a great day ya'll and HAPPY NEW YEAR!!
Julee
Subscribe to:
Posts (Atom)